TIPS FOR PIE AND TART
For optimum baking results, use a glass or dull-metal pie pan. Avoid shiny metal or disposable aluminum pans, which reflect heat and prevent crusts from browning. Dark pans may cause crusts to brown too much.
Avoid pans with holes in the bottom.
To Prevent Over-Browning Of Pie Crust
To keep baked edges from getting too brown, cover the edges with foil after the first 15 minutes of baking.
Use a 12-inch square piece of foil. Cut out a 7-inch circle from the center, and gently fold the foil "ring" around the crust's edge. Be careful, the pie will be hot!
Tenderizing for Pastry and Pie Doughs
Add one teaspoon of vinegar or lemon juice as part of your liquid for each cup of flour in pastry and pie dough recipes. This won't affect the flavor but will result in more tender baked products.
Rolling Out Pie Dough
Flour work surface very lightly. Excess flour will toughen pastry dough. Add additional flour sparingly, as needed. Roll out dough from the center to avoid overworking. A straight rolling pin is preferable for beginners. Dough can be easily moved on a rolling pin to flour the work surface or to fit dough into a pie plate. To size the dough, place a pie plate upside down on the rolled-out dough and measure an additional 1 inch around the perimeter of the plate.
"Baking Blind"
BAKING TART SHELL OR PIE CRUST "BLIND"
This is the method of pre-baking your pie or tart crust before adding the filling.
Pre-heat oven to 350F/180C.
Roll out the pastry and line the tart or pie pan carefully, making sure there are no holes. If there are, patch them with some of the leftover pastry dough. Line the pastry with parchment or waxed paper and fill with baking beans or pie weights, if you have them. If not, you can use any dried beans or rice. Bake the pastry "Blind" (without filling) at 350 degreesF/180 degreesC for 15 to 20 minutes, or until the crust is a light golden brown. Remove the paper and beans, and allow crust to cool. After crust has cooled completely, pour your filling into pre-baked tart shell, and bake as your recipe instructs.
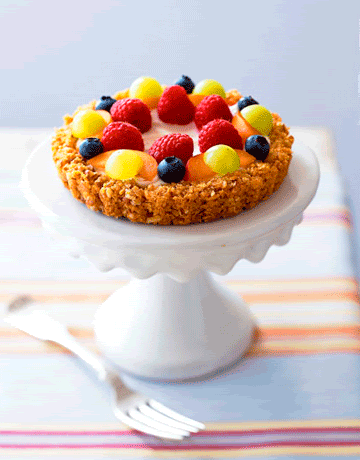
Fruit Pie Filling Tips
Great Thickener For Fruit Pies
For a wonderful way to thicken fruit pie juices without cloudiness or taste, use potato starch in the recipe instead of cornstarch or arrowroot.
10 TIPS FOR BAKING A PERFECT CUP CAKE
 Follow these tips for baking perfect cupcake treats for yourfriends and family.
1. Fill your cupcake wells 1/2 to 2/3 full. Any more and you will get a gooey mess instead of a beautiful cupcake. If you use less than 1/2 a well of batter, then you will get wimpy cupcakes and will have to use extra frosting to make them look larger.
2. Choose the right cupcake pan. Good cupcake pans are shiny and on the heavy side. They will cook 6 to 12 cupcakes at a time. Large muffin pans don't work well for baking precious little cupcakes. Make sure you have 2 pans available because then you won't have to cool a pan before you finish baking your cupcakes. Two 12 well cupcake pans should be enough for one batch of cupcakes.
3. Make it easy o remove the cupcakes from your pan. Either use paper or foil wrappers or spray the individual wells with a nonstick spray. If you are using the new silicone pans, wrappers or nonstick spray work fine in these also.
4. Don't overmix your batter. This will cause your cupcakes to be rather chewy instead of perfectly moist. Follow the directions in your cupcake recipe. If your recipe calls for a hand mixer and you are using a stand mixer, you will need to reduce you mixing time. Stand mixers mix batters faster than regular hand mixers. Consult your owners manual for mixing time adjustments.
5. Bring all ingredients to room temperature before mixing your cupcake batter. The items will mix evenly, and the result will be a wonderful cupcake batter. By mixing cold items into your batter, you risk having a lumpy batter which might cause you to overmix your batter. GASP! What a No No!
6. Bake your cupcakes at the proper temperature. Preheat your oven to the correct temperature BEFORE you put your cupcakes in the oven. An oven thermometer would also be a great idea to make sure your oven is set to the right temperature. If your oven cooks food faster at the rear of the oven, then make sure you rotate your cupcake pan halfway through the baking time.
7. Use your favorite cake batter to make cupcakes. Batter for an 8 inch layer cake usually makes 20-24 cupcakes. Just make sure you have mixed the batter well, and only fill the cupcake liners 1/2 to 2/3 full. Bake approximately 20 minutes, and check for doneness using a toothpick or cake tester inserted into the center of the cupcakes.
8. Test for doneness after the minimum cooking time. If the cupcakes aren't finished cooking after the minimum time, then place them back in the oven for some additional cooking time. Cupcakes are done when a toothpick inserted in the center comes out clean.
9. Cook only one pan of cupcakes at a time. Place your cupcake pan in the very center of your oven. If your oven tends to cook items more that are towards the back, then rotate your cupcake pan halfway through the cooking time. If you absolutely have to bake 2 pans of cupcakes at one time, make sure you switch cupcake pans halfway through the cooking time. By this I mean put the bottom pan on the top and move the top pan to the bottom.
10. Cupcakes are best eaten the same day they are made. Undecorated cupcakes can be frozen up to 3 months.
Why don't you bake your favorite cupcakes now? Enjoy one as soon as it's ready and then either share the rest with friends or freeze them for your future enjoyment!
10 TIPS FOR BAKING A PERFECT MACAROON
 1. Almond meal (finely ground almonds) will save you a lot of time, but you can also use regular almonds that you can grind yourself with a food processor. They do not have to be blanched! Other nuts also work… I’ve made successful macarons using pistachios or hazelnuts to replace almonds entirely.
 2. You do not need to slowly add in granulated sugar to the egg white mixture when beating the egg whites. Many recipes insist you must add it in slowly, but I’ve always tossed it all in at once, which saves me the annoyance of having to turn off my hand mixer every minute to add a small amount in… it has never made a difference.
3. You don’t have to use aged egg whites (I’ve made macarons with egg whites at room temperature for about an hour or two and they’ve turned out just fine), but when the climate is humid or rainy, this tends to have an adverse effect on the macaron shells… I’m not sure why but I’ve learned my lesson and avoid baking them on a rainy day!
4. Buy a piping bag with a round tip. The bags are available in disposable and reusable versions; I find them handy not only for macarons but also decorating cakes and cupcakes, and there are a huge variety of tips to choose from. This allows better control when piping the circles onto the mat for baking!
5. Use gel food coloring instead of liquid. Liquids can alter the consistency of the macarons and ruin results.
6. I like to toss the gel food coloring into the egg white mixture while I’m beating it to properly distribute the color. This works better for me than folding it in, since the electric beater does a better job. I would not recommend trying this with liquid coloring as it would alter the egg whites consistency but with the gel or powdered colors, it does fine!
7. When you are beating the egg whites till glossy/stiff, beat them till they literally do not move when you turn your bowl this way and that. If you can hold the bowl above your head and nothing moves, (and you don’t have egg whites in your hair), it’s ready!
8. When folding the egg whites with the almonds and sugar, use a flexible spatula. Fold by repeatedly scraping around the bowl and moving towards the middle. Do it no more than 50 times so as not to overmix (Yes, I used to count them!). Many recipes say the consistency should be of molten lava (that comparison doesn’t help me) but if you make it to runny pancake batter, you’ve gone too far. When you lift it with the spatula, it should spread but not too much or too far.
9. After piping the macarons onto the baking mat, let the tray sit out for at least 15-25 minutes or until the tops of the macarons look dried out and are no longer spreading. Leave spaces between them when piping to allow them to spread!
10. Halfway through the baking time, rotate the pans in the oven in case you have an oven that heats one side more than the other.
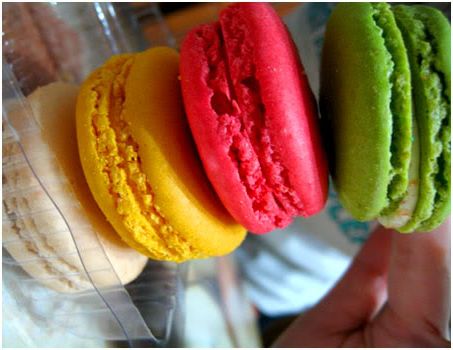
The ideal macaron should be a perfect circle (achieved only with a piping bag with a round tip), and have solid smooth bases. They should have a ruffled “skirt” or “feet” along the edges where it has risen in the oven. They should comfortably slip off your baking mat, begging to be paired with a delicious filling and another shell. They should be very slightly chewy, yet crunchy and they certainly should not crumble easily.
I tried many online recipes for macarons before I found one that worked for me. When I first made them, I did not own a kitchen scale and used cup measurements. Thanks to David Lebovitz’s recipe, they turned out great! I’ve used that recipe as the basis for all my macarons so far. It can be found here.
I’ll be posting my own macaron recipes (and my slight but tasty variations on them) here soon enough, as well as more tips, so stay tuned.
Good luck and happy baking!
No comments:
Post a Comment